This Instant Pot Greek yogurt recipe includes many tips and tricks, and so it may seem long and complicated, but it's really not. Once you make this a time or two, you will see how easy it is to make thick, creamy yogurt. And you save yourself a few dimes in the process. If you would like to use a recipe for stovetop yogurt see my homemade yogurt recipe on the stove.
Say "Yes" to Yogurt
The popularity of yogurt in the U.S. has gone from 6.5 pounds per person in 2000 to 13.4 pounds per person in 2018, and as a nation, we only trail seven countries. At number one, France eats about 43 pounds of yogurt per person per year, with a majority of people eating yogurt every day. Greek-style yogurt has become quite popular and is called for in many recipes.
Sweet or Savory
Yogurt is so popular because it makes a healthy snack, the foundation for an easy and delicious dessert (like my luscious mango custard), a perfect sauce, and as a side dish (like my 5-minute raita). And it is a key marinade ingredient that does wonders to tenderize proteins. Touted for its many health properties, yogurt also makes the perfect breakfast, garnished with nuts, dried or fresh fruit, or indulgently, with a favorite jam.
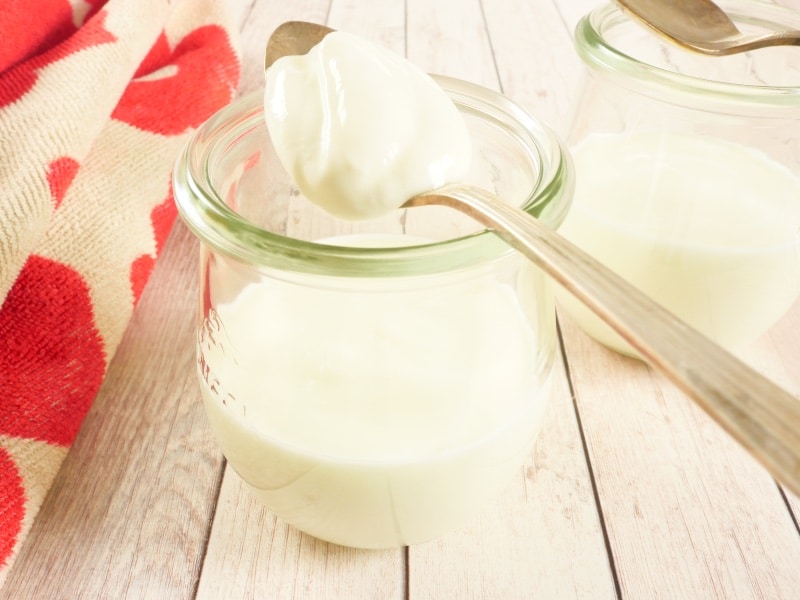
Strain 'Til Perfect
Greek-style yogurt is simply yogurt that has been strained of much of the whey so that it is thick and creamy. The good news is that all you need for the creamy yogurt of your dreams is good milk (organic ideally) and a yogurt starter. Find a plain yogurt that you like and make sure that it lists active bacterial cultures in the ingredient list. If you want to go all fancy, you can try an “heirloom” starter that can be purchased online or at your local health food store.
Culturing Yogurt
This type of starter is freeze-dried and is designed to help you keep making yogurt indefinitely. Typical store-bought yogurts contain only several strains of bacteria, and may only be a good thickening agent for several generations of yogurt. Some brands of dried yogurt starter are Euro Cuisine All Natural Culture and, for a vegan option, there is a starter from Cultures for Health simply called vegan yogurt starter.
Heat on the Stovetop or in the IP
I have included instruction for heating the milk on either the stovetop and in the Instant Pot. The advantage of using the Instant Pot is that you don’t have to babysit the milk to maintain the right temperature, and you use the same pot. The disadvantage is that it takes almost twice the time, and it may take two cycles on the "boil" setting to heat the milk. I tend to be a bit more of a control freak and prefer heating the milk on the stove. You decide which method works best for you.
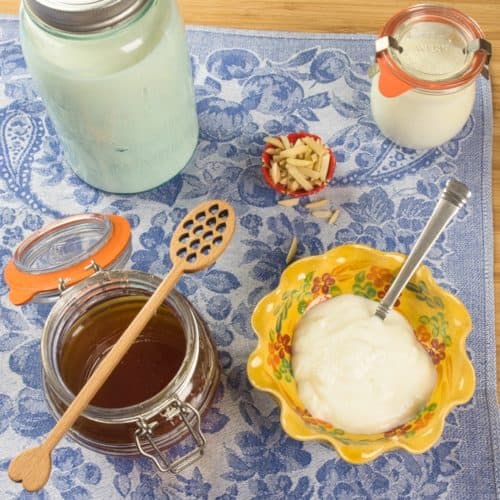
Make Cream Cheese!
If you would like to try your hand at a very good homemade cream cheese, take your finished yogurt, strain it, then store it in the fridge for 24 hours, wrapped in cheesecloth. Let’s face it, cream cheese is pretty high in fat, so if you want to have a richer end result, add heavy cream to your yogurt by mixing it into the milk before the heating step. One-quarter to one-half cup is a good place to start for 2 quarts of milk. I’ve included the instructions below if you would like to give it a go.
Happy cooking!
~ Alonna
See the Notes below before you cook.


Recipe Card 📖

Instant Pot Greek Yogurt
Equipment
- Instant Pot or Mealthy Multipot
- Large saucepan if heating milk on the stovetop
- Large spoon or a silicone spatula
- Glass bowl or measuring cup
- Instant-read thermometer (See Notes below if you don't have one)
- Wire whisk
- Several glass jars with lids to store your yogurt; either individual jars or 2 larger ones
Ingrediants
- 2 quarts whole milk ~ Ideally organic
- 2 tablespoons plain yogurt ~ With live cultures
Instructions
Preparation
- Sterilize your utensils and the inner pot of the Instant Pot. Remove all curry and chili smells and flavors. Gather the milk and yogurt (you are using as a starter).


Heat the Milk on the Stovetop
- Heat the milk over medium heat in a saucepan. I use an enameled cast-iron dutch-oven because it tends to maintain a more even heat. Using an instant-read thermometer (see Notes below if you don’t have one) keep an eye on the temperature of the milk. Stir frequently to prevent scorching. For pourable, European-style yogurt, heat to 182ºF/84ºC and for very thick custard-style yogurt, heat to 192ºF/88ºC. Do not let the temperature go over 195ºF/90ºC or you will kill the beneficial bacteria.
- Hold the desired temperature for 10 minutes. Turn down the heat to the lowest setting. Continue to stir often during this step so the milk heats evenly and to prevent the milk from sticking. Increase the temperature as needed.
Heat the Milk in the Instant Pot
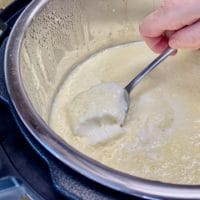
- Pour the milk into the Instant Pot inner pot and cover with the lid. Press the yogurt setting until it says boil and turn the pressure release valve to venting. Whisking the milk about every 10 minutes will help the milk come to temperature more quickly and evenly. The boil cycle will take about 45 to 60 minutes. For pourable, European-style yogurt, heat to 182ºF/84ºC and for very thick custard-style yogurt, heat to 192ºF/88ºC. Do not let the temperature go over 195ºF/90ºC.
- If after one boil cycle the yogurt has not reached the desired temperature, turn the Instant Pot to sauté. Check the temperature after 5 minutes, continuing to stir occasionally to help with milk heat up evenly and prevent scorching.
Cooling the Milk
- Cool the milk to 115ºF/46ºC. If you heated the milk on top of the stove, pour it into the Instant Pot. Allow the milk to cool naturally, checking the temperature at the 30-minute mark. Or to hurry the cooling process, pour cold water into a baking pan and place the pot of milk in it. Adding ice cubes to the water and stirring the milk occasionally will both hasten the cooling.
- Depending on whether you allow the milk to cool naturally, chill in cold water, or add ice, this step can take anywhere from 30 minutes to 5 minutes. Important: check the temperature often because the milk should not go below 110ºF/43ºC.

Innoculation & Incubation
- Spoon out 1 cup of milk in a small bowl and stir in the 2 tablespoons of starter. Gently whisk together to combine. Stir the inoculated milk back into the rest milk and mix gently but thoroughly. Pour the milk and yogurt mixture into the rest of the milk, and into the inner pot of the Instant Pot, if you heated the milk on the stove.
- Turn the Instant Pot setting to yogurt "normal" mode, if you heated the milk on the stovetop. If you heated the milk in the Instant Pot, when the boil cycle is complete, it will automatically switch to yogurt mode. Close the lid and turn the pressure release valve to venting. Set the incubate time to 10 hours, but start checking at the 6 hour mark. In my experience, most batches take about 9 hours. Keep in mind that the yogurt will firm up overnight in the refrigerator and the longer the yogurt ferments, the more sour it will be.

You have Yogurt!
- If your yogurt isn't thick enough you can strain it. Using the instructions in the "you have cream cheese" section, strain for up to 4 hours. You can strain it before allowing it to thicken and set in the refrigerator overnight, or strain it the next day. You will have more whey strained off if straining before the yogurt is chilled, thus less yogurt yield.

- You should have 6 to 7 cups of yogurt and it will keep in the refrigerator for up to 2 weeks. If you are happy with your yogurt, save 1/4 to 1/2 cup as a starter for the next batch of yogurt. You can keep it in the freezer if you won't be using it within 2 weeks. Add any flavorings and sweeteners to the yogurt after the overnight stay in the refrigerator.
You have Cream Cheese!
- Using 4 layers of cheesecloth or coffee filters, line a large mesh strainer and place it on top of a deep bowl. Add the yogurt and cover it with the cheesecloth or, if using coffee filters, plastic wrap so it doesn't dry out. Strain for at least 4 hours, and up to 24 hours in the refrigerator. Drain off the accumulated whey occasionally. When the cream cheese is thick enough, give it a good stir and add salt to taste. It will keep in the refrigerator for up to 1 week.
Notes
- Make sure the yogurt you are using as a starter is not near the expiration date. I made the mistake of this once, and my yogurt did not thicken well.
- If you find your yogurt isn’t setting properly and you are using a homemade yogurt starter, you will need to use a new store-bought yogurt. The strains in the bacteria may be too weak to culture well for more than 3 or 4 batches.
- If you have accidentally boiled your milk instead of bringing it to 182ºF/84ºC to 192ºF/88ºC, your yogurt will still be good; however, it will have a more “cooked” taste.
- Without a thermometer: If you don’t have a kitchen thermometer, you CAN make yogurt without it. Heat the milk up until you see small bubbles forming around the edge of the pan. Maintain that temperature for 10 minutes. When cooling the milk to 115ºF/46ºC degrees, hold your hand over the milk before sticking a finger in. If it isn’t too hot, insert a finger; and if the water feels hot but you can still keep your finger in it for 10 seconds or more, you are close to the 115ºF/46ºC degree target.
- The advantage of using the Instant Pot to heat the milk is that you don’t have to babysit it to maintain the right temperature, and you use the same pot. The disadvantage is that it takes almost twice the time, and it may take two cycles to bring the milk up to temperature. I tend to be a bit of a control freak and prefer heating the milk on the stove. You decide which method works best for you.
- A great tool for straining your yogurt is the Euro Cuisine Yogurt Maker.
- Stirring your milk often, both in the heating and cooling phases, will help it come to temperature more quickly and evenly. Also, take the temperature after stirring the milk because it will be at a more even temperature throughout.
- Add a 1/4 cup cream into the milk before the heating step
- Add dried milk powder before heating the milk. Add 2/3 cup of dried milk to 2 quarts of milk.
- Keep the milk at 192ºF/88ºC for 20 minutes instead of the 10 minutes I recommend. The longer heating time allows the milk to evaporate and get thicker.
- I have not tried this but I gather that you can use the leftover whey to use as a yogurt starter. Paula, of the blog Salad in a Jar, has used whey instead of yogurt as a starter successfully.
- Make ricotta cheese: The yogurt maker manufacturer Luvele has a blog that is a great resource for all things yogurt. They have a recipe to make homemade ricotta with leftover whey.
- Pet food: whey adds good nutrition and flavor. It is especially great on top of dry dog food.
- In marinades to tenderize proteins.
- In baking as a substitute for milk. Don’t forget pancakes!
- In soup as a substitute for stock.
- In smoothies and instead of milk for your cereal.
- Soak grains, nuts, and seeds
Leave a Reply